Easy Cork Coasters

Easy Cork Coasters Tutorial

Want to know a quick and fun project to use up some cork scraps? Or maybe you want an easy project to try out cork? I thought up these cork coasters and they are so fast to make. Here’s a quick tutorial.
You’ll need for a set of 4 coasters:

Cut the cork into 3.5″ squares, and the stabilizer/plastic canvas into 3″ squares.
Easy Cork Coasters Tutorial

I used a small piece of Wonder Tape to hold the plastic canvas in place so it didn’t shift. Center the plastic canvas on the wrong side of one piece of cork, leaving a 1/4″ all the way around.
Easy Cork Coasters Tutorial

Easy Cork Coasters Tutorial

Now take another piece of cork in the second colour and sandwich the plastic canvas between the 2 pieces of cork, clip together and sew! I used a longer stitch length than usual for a nice smooth look, and a scant 1/4″ seam allowance.
Easy Cork Coasters Tutorial

Once they’re sewn together, you may want to go around each edge and trim to make sure the edges match up from each side. If you want to add the metal corners, check out the listing page for a simple tutorial.
Easy Cork Coasters Tutorial

I’ve got some fun ideas for these too, like reverse applique with fabric underneath peeking through, or fancy stitching… so many possibilities and with a project this quick, you won’t take long finding a way to add your own creative spin!
Easy Cork Coasters Tutorial

Sew Sweetness Minikins Bag Swap

Time for another swap! The Sew Sweetness Minikins bundle is full of great, quick patterns that make a perfect swap item. Even though the projects are fast to sew, I’m giving you plenty of time to complete the swap, so it’s meant to be fun and would be perfect for first-timers! Sara of Sew Sweetness has also offered up 2 gift certificates to be won by swap participants! 
Sew Sweetness Minikins Bag Swap

Details

If you haven’t been in a swap before, that’s ok! To sign up, fill out the form below, making sure to read the expectations at the bottom of the form. Basically, you sign up, wait for a partner, then once you’ve been assigned a partner, get started! Choose any pattern in the minikins bundle to make for your partner. You can add extras or even make a second minikins if you like, but it’s not required. You’ll need to check in twice on Instagram so I can make sure everyone is on track.
​Checking in with me involves posting a picture on Instagram, tagging me @reecemontgomery, and including #MinikinsBagSwap. First check in is due February 18, showing which pattern you’ve narrowed it down to and hinting at fabric selection; basically just showing that you’re ready to get started. Second check in is due February 28 and should show me that you’ll be able to send your item on time. Items due to be mailed March 7. 

Giveaway

For added fun, and if you’re looking for one more push to grab the Minikins bundle and join, there are 2 gift certificates to be given away to participants. Once projects have been completed, a random drawing for 2 winners will be done. The prizes are a $25 and $50 gift certificate to use in the Sew Sweetness shop.  Completing your check ins and sending your swap item automatically enters you in the giveaway.
Minikins Bag Swap

Fill in the form to enter the swap!

Once you’ve submitted your form, repost my swap announcement picture and tag me @reecemontgomery with #MinikinsBagSwap to show you’ve entered. Make sure your profile is public so I can see your posts.
Happy swapping! If you still need the Minikins bundle, grab it here. Thanks for joining us! If you have any questions, feel free to ask – just send me a message.

Hello With Love – Reverse Applique Tutorial

This tutorial was originally released in the digital sewing magazine One Thimble, Issue 10. You can find loads of other articles and patterns there, but for now, I’m able to share my contribution with you here. Just in time for Valentine’s Day, this one counts as a seasonal craft!
Hello With Love Reverse Applique Tutorial | Happy Okapi Blog


Reverse Applique Pillow

My kids always come home with artwork with their handprints on them, often made into animals or other shapes. I love seeing them, and I try to keep most of them, but I wanted to find a more permanent way than just paper and paint to capture that moment in time. I decided to use their handprints on a pillowcase, which will be treasured in our home for many years to come. Rather than a regular appliqué, I chose a reverse appliqué, for that extra special touch. The extra work is so worth it.
Tutorial for pillowcase:
You’ll need:

I have 2 kids, so my project has 2 handprints. Really though, you can have as many or as little as you like, but you may need a bigger pillow if you add more than 4 handprints.

You can trace the handprints onto regular paper if you like, or simply take a photocopy and cut the copy out! Make sure when tracing or photocopying, that the hand is splayed enough that the fingers are not touching each other.

Pick some scraps big enough to overlap each handprint by about 2” – maybe have each child pick their own scrap to help personalize it even more!

Hello With Love Reverse Applique Tutorial | Happy Okapi Blog

Start by cutting out the main fabric for the pillowcase. My pillow form is approximately 15”H x 16”W and I used the formula of H+2 x 2W+5 to get the size of my fabric, so in my case, I cut 17”H x 37”W. For this tutorial, these are the numbers I’ll use, but if your project size is different, you’ll need to adjust accordingly.

Once you’ve cut the fabric, lay it out and, on the wrong side of the fabric, mark a line parallel to the short sides, 9” from the left, and another line 25” from the left edge – you should have a 16” section now, slightly off centre. Fold the outer edges in (wrong sides together) to overlap over the middle section and press in place along the lines you marked.

Hello With Love Reverse Applique Tutorial | Happy Okapi Blog

Hello With Love Reverse Applique Tutorial | Happy Okapi Blog

Now cut out the handprints from the paper and lay them in the centre section to help decide on your desired layout. I cut out a heart as well, and moved it around at this point too, as a visual aid for the finished project. Once you decide on your layout, trace one handprint where you’d like it onto the wrong side of the middle section of the pillowcase.
Hello With Love Reverse Applique Tutorial | Happy Okapi Blog

Now draw a line about ½” inside the outline of the print, but only for the palm of the hand (it may help to use a different coloured pen for this step). Draw lines in the centre of each finger, meeting each line to the centre. These lines will be referred to as the seam allowance.
Hello With Love Reverse Applique Tutorial | Happy Okapi Blog

At the ends of each finger, draw small diagonal lines, meeting at the centre line (seam allowance).
Hello With Love Reverse Applique Tutorial | Happy Okapi Blog

Draw small notches at each curve.

Add small pieces of Wonder Tape all around the outline of the hand, as close to the outline mark as possible.

Hello With Love Reverse Applique Tutorial | Happy Okapi Blog

Now we’re going to start cutting out the centre seam allowance. It’s important to note: DO NOT CUT the main outline of the handprint, only notches up to the outline. Starting with the palm of the hand, cut out the seam allowance.
Hello With Love Reverse Applique Tutorial | Happy Okapi Blog

For the remaining seam allowance, we’re only making slits for the fingers, and small clips for the curves. If you haven’t already, remove the backing from the Wonder Tape and start folding the seam allowance up and over, wrong sides together, securing in place with the Wonder Tape. Take your time here; you may need to make a few extra notches as you go.  Where the fingers meet the palm, cut a triangle-shaped notch to reduce bulk in seam allowance. You may need to use Wonder Tape on top of one finger’s seam allowance to lay down the seam allowance from the finger next to it (this is why I mentioned earlier to make sure the fingers are splayed). You may also find it helpful to fold up the bottom point (the space between the fingers at the palm). Fray-Check might help here too if you had to cut many notches at one small area.
Hello With Love Reverse Applique Tutorial | Happy Okapi Blog


Once all the seam allowances are folded out of the way, add another couple pieces of Wonder Tape around the outline of the hand, and lay your scrap over the opening, so the right side shows through the opening. Turn over and inspect; make any adjustments at this point if necessary.
Hello With Love Reverse Applique Tutorial | Happy Okapi Blog

Cut a piece of fusible interfacing that is about 2” larger than the scrap you just placed, and place over scrap at back of project (wrong side) so that fusible side is against wrong side of scrap and main fabric. Fuse to secure scrap in place over outline.

Repeat with remaining handprint(s) and heart.

Hello With Love Reverse Applique Tutorial | Happy Okapi Blog


Hello With Love Reverse Applique Tutorial | Happy Okapi Blog

The final part of the appliqué is to stitch all around the shapes we’ve formed. I used my regular foot and a slightly longer stitch length, at 1/8” from the edge of the shape. I used a thread to match my main fabric, but a contrasting thread would also be a nice look. For this step, take your time and go around each curve carefully. Leave your needle in the down position and lift your foot to help pivot and reposition around sharper corners (like the fingertips).
Hello With Love Reverse Applique Tutorial | Happy Okapi Blog

Once the stitching around is done, all that’s left is sewing the pillowcase.

Fold in each short edge by a scant ½”, press in place and fold in again, hiding raw edges inside the fold to create a “hem” on each short end, then stitch in place.

Hello With Love Reverse Applique Tutorial | Happy Okapi Blog

Now fold the shorter edges (the hems) in to the centre again along the lines you marked previously at 9” and 25” so one hem is overlapping the other and right sides of the pillowcase are out and you’ll have raw edges along the top and bottom of the case. Make sure the hems are laying nice and flat.
Hello With Love Reverse Applique Tutorial | Happy Okapi Blog

We’ll be doing French seams, so you want to make sure your edges match up. If you need to square the top and bottom, do that now.
Hello With Love Reverse Applique Tutorial | Happy Okapi Blog

Sew each raw edge (top and bottom) with a generous ¼” seam allowance. Clip corners and turn inside out. Make sure all corners and seams are pointed out and flat. Sew top and bottom seam with a scant ½” seam allowance to encase the previous line of stitching and hide the raw edges.

Now turn right side out and admire your new pillowcase!

Hello With Love Reverse Applique Tutorial | Happy Okapi Blog


I hope you enjoyed this idea and I’d love to see if you use it; if you do, please share with me! This would make a great gift for grandparents but works as functional art in the home too.
Hello With Love Reverse Applique Tutorial | Happy Okapi Blog

Best Nine 2017

I’m alive! I’m still here, I’ve just been enjoying a slow start to the year, and recovering from the busyness of Christmas, and all that goes along with the winter holidays. I hope you all had a nice end to 2017. I had some sewing goals for 2017 that I didn’t quite get to, but I’m not upset about it either. To be honest, I’ve never been much for resolutions. I feel like if things are worth changing, they aren’t worth waiting for. So, before I move forward with any projects in 2018, let’s take a look back at 2017. I got this picture generated from 2017bestnine.com, and it does all the work for you if you enter your Instagram ID. 
Picture


Top Left – Minikins

Sew Sweetness released this amazing bundle of quick-sew projects, just in time for the holidays. The Minikins bundle includes 12 patterns and an instructional video to go along with each. This Zeppelin Pouch was my 4th make from the bundle and I can’t wait to make the rest! I whipped this up one night when I realized I still needed a teacher gift for the next day, yikes! 

Middle Row – Luxie Lunch Bag

Emmaline Bags’ Luxie Lunch bag took up one third of my top nine! No surprise really, since I made so many. The top two were for coworkers made with Alison Glass and Cotton + Steel fabrics, all from Fabric Spark. The bottom one I received in a swap, it was made by Jenny ofSincerely Jen. Here’s the one I made for the swap, using Libs Elliott’s Tattooed fabric collection.
Picture

Top Right – Paper Pieced Unicorn

For another Instagram swap, I made this foundation paper-pieced unicorn mini quilt. The pattern is from Robynie Patterns. I haven’t done a whole lot of paper piecing and this was definitely a challenge for me. It wasn’t particularly difficult but I did find it overwhelming at times, as it was much more labour intensive than I had bargained for. For the quilting, I chose scattered lines to go with the pieced fabric, but I also included some stars (you can see one quite well in the bottom right corner of this picture). I’m so proud of how it turned out and it was pretty difficult letting it go. I did receive a gorgeous mini in return so it all worked out.
Picture


Middle Left – Sew Sweetness Sublime 

I tested this bag when it was part of the Bag of the Month Club, but you can now get this as a stand alone pattern, or bundle it with an online workshop/video. You can read more details about this bag in my post from when it was released.
Picture

Middle Right – Easy Peasy Purse

I made this adorable kiss-lock frame purse for a little girl for her birthday. I used Patty Sloniger’s Into The Deep collection from Sitka Fabrics. My son picked the fabric and was quite proud to give this as a gift for his friend, while announcing his mommy made it. I figure it won’t be long before they’re too embarrassed to give gifts I’ve made so I’ll take it while I can get it. The pattern and instructions are part of a Craftsy Class, or you can get the pattern by itself.

Bottom Left – Retreat Bag

I can’t believe it took me so long to make one of these! The Retreat Bag is a free pattern from Emmaline Bags and is the perfect way to get your sewing fix in. I received this gorgeous Cotton + Steel Menagerie fabric as a gift and had big projects on the go, but I couldn’t let it just sit there, so I chose the Retreat Bag as my quick project to display the fabric. 
Picture

Bottom Right – Cassette Polaris

This is the project I was most excited about last year. My friend Lysa Flower designed this paper pieced pattern for a cassette tape and asked me to use Kim Kight’s (at the time unreleased) Snap to Grid fabric to turn a Polaris bag into a 3D cassette. You can read more about the project inthis post here


My Favourites

Along with the ones above, here are some of my favourites:

Picture

Backpacks for each of them! Details can be found in this post.

Blue Calla Tansy Zippered Tote. I made this for a friend and I also made a smaller matching one for her daughter. I’ll write more about it soon, but for now, you can find the pattern here
Picture

Picture

Castell Day Bag. I love this bag so much I hosted a sew along for it! I also personally used this pattern for my own carry on luggage and thought it was perfect.

Picture

Blue Calla Clover Convertible Bag. I wrote all about it at the beginning of last year when the pattern was released as part of the Bag of the Month Club; find all the details here.


What were your favourite makes of 2017?

Mom’s Wedding Dress

The Universe is messing with me, and that ish is not funny! Well, not that funny… yet. Let’s go all the way back to last May so I can tell you what happened…

My cousins in Jamaica invited my parents (his aunt and uncle) to their daughter’s wedding to take place in November. Yes, November. Mom said to me, “I have to get a new dress to wear to the wedding. If you can make me one, that would be so nice, but I can always go down to the mall and buy one.” (From now on, I will refer to said dress as the Wedding Dress, so try not to get confused. My mom was not the one getting married. Dad would surely object.)

This post contains affiliate links

It worked out that we had 6 months, yes 6 whole months, to find the material and pattern, and get my slow-ass self to sew it. Remember the wedding is still 6 months out. 6 months!!! … How many months?? You got it. S.I.X.

Oh! I need to mention here that I’m still terrified to sew with knits. Everyone tells me knits are forgiving. Toward me, they’re not. This will come back to bite me later in my story.

And the hunt was on for the perfect fabric and the perfect pattern. The fabric had to be bold, but not too busy; light but not transparent; good quality but not expensive. The pattern had a slightly longer list of requirements:

  • calf length or longer
  • pleats or gathers at the waist
  • short to three-quarter length sleeves
  • no frou-frou except ruffles; ruffles are always good.
  • no elastic in the waist (on account of the heat and humidity)
  • modest neckline
  • large armscye (pronounced arm-sigh or arms-eye)

Long story short-ish, I searched through fabric store after fabric store in Montreal and online. I did find a very pretty coral linen blend at Fabricville/Fabricland’s website. But the last time I’d ordered from them, I got a piece of trash, so I couldn’t bring myself to click that checkout button without having had my hands on the fabric first. And that’s how an entire season and a half passed with no fabric purchase.

At one point I sent Mom a photo of a satiny embroidered blue thing, and she texted back, “You want me to wear ants to the wedding?!” I looked again at the picture and sure enough, bad lighting + bad angle + phone camera = embroidery ants.

While the great fabric quest was on, I bought several patterns, none of which was just right. That was from the myriad rejected photos of pattern covers I sent my mom. So, not much luck in the pattern department either.

These guys made it to the finals before they got cut

As a pre-emptive backup, I bought this Vogue pattern on sale, although I would have had to do some modifications. I love hacking bags and accessories, but I’m still insecure about hacking clothing patterns.

Still in the running (Photo credit: Vogue website product description)

And then! Two things happened serendipitously. My BBF made some time to drive me out of town to Club Tissus, the huge fabric store in the middle of nowhere. Two hours later, after several mysteriously falling racks and a giggle-inducing “flipping” incident at the cutting table, I walked out of there with a lovely coral printed knit (remember I don’t do knits) and a couple more patterns that looked like they would work for the Wedding Dress (plus, you know, lots of notions I didn’t need.)

That rack didn’t see it coming!


One of the patterns bought at Club Tissus (Photo credit: McCall’s website product description.)

The second thing that happened right around then was that Blackbird Fabrics in BC got some new prints in stock and I fell in love with this pretty camel-coloured floral. (Yes, the colour is “camel” and not “caramel”.) Caroline, the owner, checked my pattern (the Vogue one above) and assured me that this adorable polyester crepe would work well with it. (Check out Caroline’s podcast at Love to Sew.)

Polyester just got delicious! (Photo used with permission of Blackbird Fabrics)


I love the content and care label attached. (All fabric sellers should do this, even when you buy in store.)

I had used fabrics from Blackbird before and loved them, so I was willing to put my Poly-Prejudice aside and trust that it would not behave badly like the traditional Poly-Crap. I ordered some.

There I was at the end of September with two acceptable, but not quite perfect, fabric/pattern combinations.

I just needed to cut and sew, and my mom would have two dresses to choose from. I was feeling pretty confident. But, cats! (The least they could have done is make sure I didn’t get all blurry photos. Jerks!)

Rapscallions!


Helpers will help, and knits will flip.

And then I forgot to flip the pattern so I cut the left and right bodice the same. (What is up with this fabric and flipping, man?!?)

Two perfectly cut identical pieces


Forgot to flip the flip

They needed to be mirror image and wouldn’t you know it, I didn’t have enough fabric to recut the piece all in one. I had to resort to cutting up the pattern and cobbling pieces together.

Slashed pattern


Now halfway through October, I had to face the fact that I could only do one dress, if that. Hey! why not go ahead and pick the knit one that you have no experience with, Marsh? Yeah, let’s do that! (Mumble, mumble… stupid, uncooperative… mumble… slipping and sliding… flippin’…)

Then mom had a brilliant thought. I would do as much as I could in the time that I had, and she would take it to her very talented dressmaker cousin in Jamaica to finish. Whoohoo! She is so understanding, and it helped me feel a teeny bit better when I was only able to get halfway through the knit dress (McCall’s pattern) and got stuck because I couldn’t make heads nor tails of the instructions. (I did, however, keep track of the tops and bottoms of the pattern bits.)

I reluctantly packaged both un-dresses with the required notions and matching thread, and delivered them safely to Mom’s suitcase. Her cousin could figure it out from there. (Ok, I did feel a ton of guilt and shame, and general misery because I couldn’t deliver what I’d promised. Still not over it, but…)

So, the half-made Wedding Dress 1 and the un-begun Wedding Dress 2 got to the cousin. Cousin Jean didn’t have time to do both, but she agreed to finish WD1. But guess what! Mom tried on the pieces that I had already assembled and the flippin’ armscye was too small, aaaand there wasn’t enough leftover fabric to cut new sleeves. (Whaaaaa!) Skillful Cousin Jean found a solution (I have no idea what) and got it all sorted. Mom wore the imperfect Wedding Dress to the perfect tropical wedding mid-November. (No photos of the finished WD1.)

Now comes the twist to the plot. You thought the story was over, didn’t you? You know better…

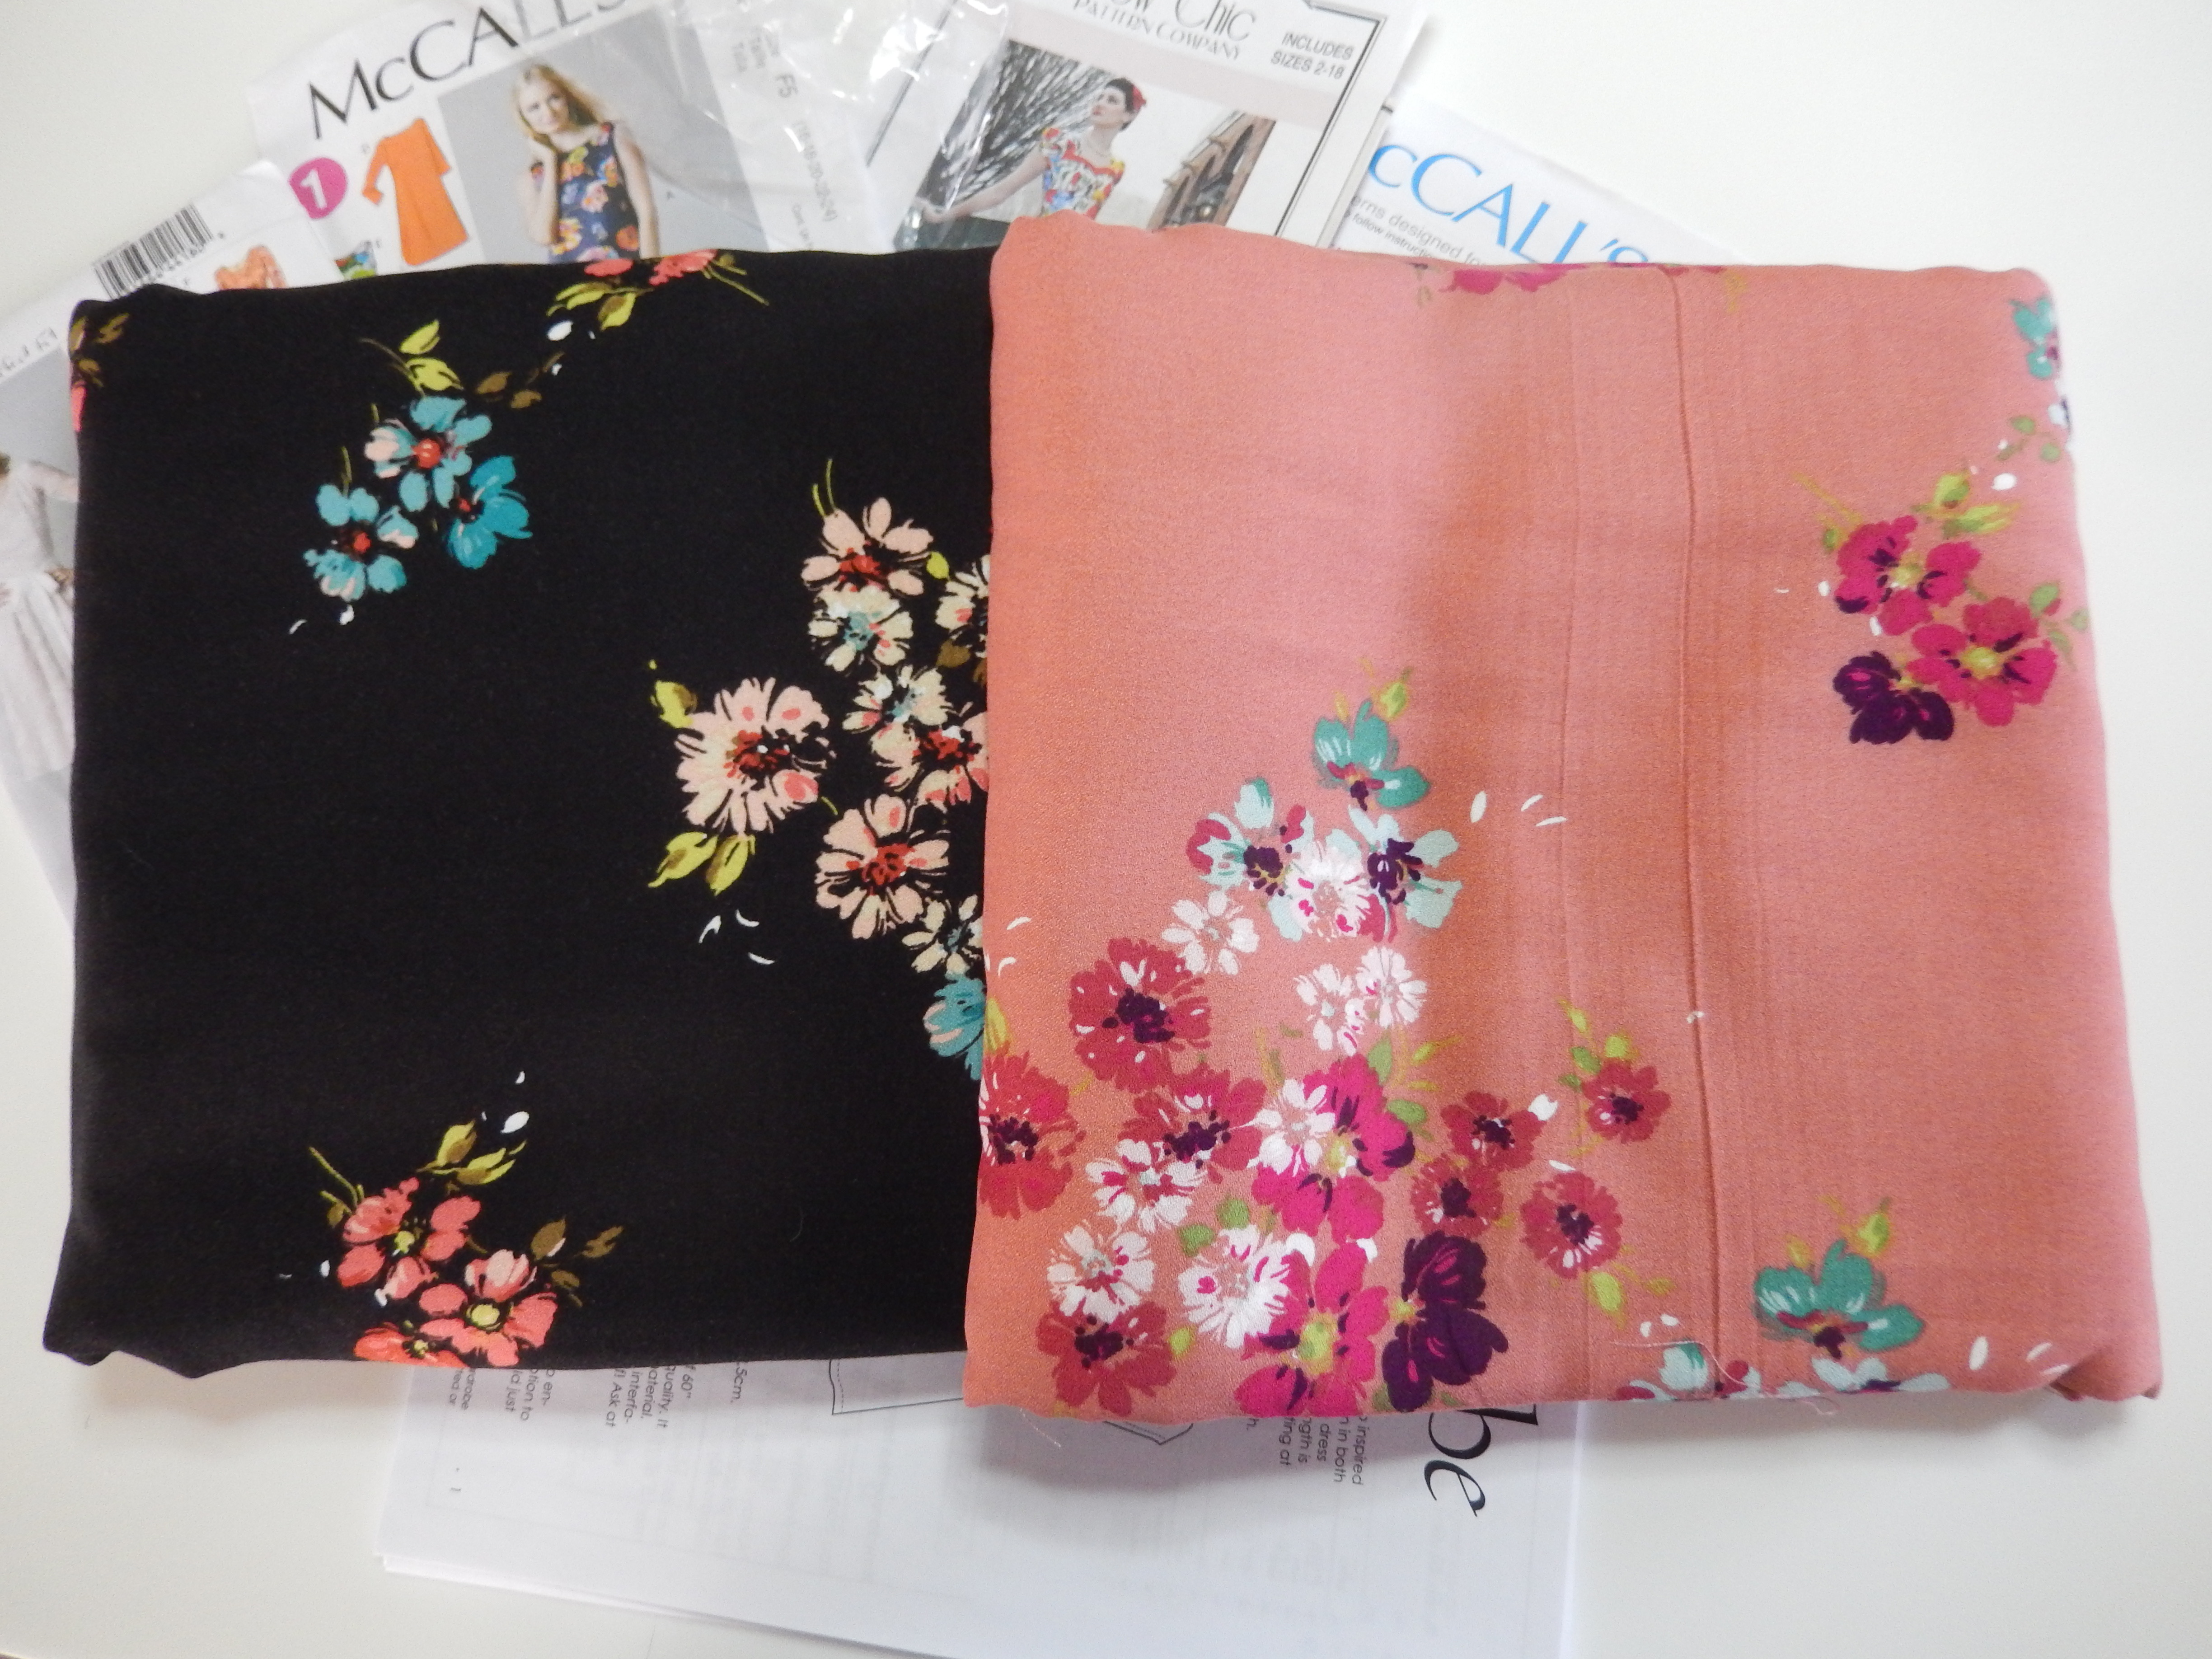
Two weeks ago, I got the regular newsletter from Blackbird Fabrics. More new prints had arrived. And, in the mix, was a sweet little viscose thing in two colour ways. As soon as I saw it, I knew that was the perfect fabric we had been searching for. I sent the link to Mom and she squeaked with delight, at least I think it was a squeak. She agreed it was the perfect fabric. Too bad the wedding was 6 weeks ago.

Also last week, Patricia (naughty elf!) from Sew Far North got me looking at the Boxing Week sales at Designer Stitch. That’s where I tripped over this pattern, the Kristen dress. Are you freakin kidding me?

Let’s see… calf length? Can be arranged. Pleats or gathers? Check! Sleeves (not long)? Check! Ruffles? Yes! No elastic? Yup! Modest neckline? Present! And just look at the size of those armscyes! (You can’t really see the size of the armscyes so trust me, they’re big. I asked.)

Kristen dress in red. Oh myyyyyy!


Just look at those perfectly placed ruffles!

Other bene”fits” to this pattern: Princess seams and a choice of cup sizes — two things that help get the perfect fit.

I bought it! Now that I had the perfect pattern and the perfect fabric, Mom casually reminded me that her birthday is in 6 (that number again!) weeks. And guess what she wants. That’s right; she wants a Kristen dress made with coral Open Floral Viscose Crepe that is even juicier when you get your hands on it. Could this be my chance to redeem myself? Possibly.

Patricia frolicking in her version of the Kristen dress:

Don’t be fooled by her charming smile. She’s still a naughty elf!

So now on top of all the no-sew-slow-sewing that goes on around here, we’re adding a birthday dress to the pile. And Wedding Dress 2 is on its way back to languish in UFO purgatory with my other bright ideas.

Why, oh, why didn’t I find the pattern and the fabric last summer? It would have saved Mom and me a lot of angst, not to mention dough. I suppose I better get to printing and cutting so 6 more months from now, I’m not still working on the Birthday Dress. That would just be tragic.

Maybe one day next year I’ll think back on this and laugh and laugh… For now, Universe, you go right on ahead and amuse yourself at my expense.

Cheers

Marsha Law Sig2

PS. Visit the Canadian Directory of Sewing and Craft Businesses

PPS. I loved saying, “the size of the armscyes.”

Note: Photos of the Kristen dress are all used with permission of Designer Stitch.

Tags: , , , , ,

Hola From One Thimble

One Thimble 17 Full Issue Review

One Thimble Issue 17

It’s the summer issue for One Thimble and as cold it seems up here (in Canada), the celebrations down under are enough to inspire warm thoughts and sunny memories. This whole issue has a definite Mexican feel to it and you might want to skip the coffee and go for the Sangria while enjoying this read. I’m joining in on the Pattern Revolution blog tour so make sure to see the schedule at the bottom of this post for the rest of the tour.

What’s Inside?

This issue includes 14 patterns/tutorials for a variety of items including a couple handsewn projects and some bags, plus clothing and accessories.
One Thimble Issue 17

​I love the assortment in this instalment: there’s a lot I would use, for myself and my kids. Sometimes sewing for boys doesn’t give a lot of inspiration, but there are several patterns here that my boys would love! 
One Thimble Issue 17 - Sewing for Boys

Aside from the patterns, the e-zine is loaded with articles, including ones giving tips on faster sewingembellishing fabric and sewing with denim. I loved the How-To from Kylie of Little Moo Designs for the Tassel Necklace; with Christmas around the corner, this could make a great quick gift. Speaking of gifting, you can also read about how to start a handmade gift tradition, including some ideas on what to make, plus some beautiful gift wrapping ideas which I’m sure to try out this season.

There’s also a whole section on growing your creative business, including graphic design tips and social media how-to’s. 

I really enjoyed reading about Frida Kahlo, who remains an inspiration worldwide even more than 50 years after her passing. The story of Tiyamike Sewing was uplifting, reading about women being empowered by sewing was so moving.

If you’re looking for things to fill your Christmas wish list with, that’s in there too!

Each issue also includes various discounts from sewing related businesses.

What I Made

The Festival Clutch

The Festival Clutch caught my eye right away. Fringe and tassels are so big right now and I resisted the trend at first (kinda like skinny jeans) but I’ve fallen hard, and I’m not looking back! This pattern is from Little Moo Designs.
The Festival Clutch for One Thimble Issue 17

I chose an indigo Essex Linen as the main fabric for my bag, to give it a denim look and a rich brown genuine leather for the accent and fringing. I topped the accent with copper rivets and I’m channeling my inner cowgirl with this clutch!
The Festival Clutch | Happy Okapi

I love how quick and simple it was and that you can really change the look quite easily depending on fabrics and how you choose to dress up the accent. I chose a bright pink lining to keep it fun. 
The Festival Clutch | Happy Okapi

The pattern comes in 2 sizes and I made the small, and I think this picture is deceiving because it’s really not that small, maybe my hand is just really big? Anyway, I thought it looked so cute next to my enormous hand.
The Festival Clutch | Happy Okapi

Flora Fiesta Embroidery

Lately I’ve been intrigued by “slow sewing” and thought this would be the perfect pattern to get acquainted with embroidery. This is a pattern with only 2 stitches: the back stitch and the satin stitch, so it’s great for beginners, like me! This pattern is from Molly and Mama.
Flora Fiesta Embroidery for One Thimble Issue 17

I loved the idea of adding a fun pompom trim and keeping the project in the hoop to display. Of course, you can also use it on a decorative pillowcase, or panel on a larger project if you like instead. Mine certainly isn’t perfect, but it’s not too bad for my first project.
Flora Fiesta Embroidery | Happy Okapi

I’m going to show you the back now, and I’m warning you in hopes you don’t judge me too harshly. My son remarked “it’s so crazy in the back, but so nice in the front” and he’s totally right! I’m actually sharing so you’re not too hard on yourself should yours look similar. You may note: I caught the interfacing and excess fabric at one point and just kept going, no guts, no glory!
Flora Fiesta Embroidery | Happy Okapi

No matter though, the pattern details how to hide that crazy back with a circle of felt and some glue. I feel like glue and felt are always the answer to my problems.
Flora Fiesta Embroidery | Happy Okapi

Sewperior Fruit & Veg Bags

This PDF from Coco-Kalana is completely opposite of the last one in terms of how long it takes to complete; these are seriously quick and pretty fun too! I love the idea of reusable produce bags, and they make a great gift as a set too.
Sewperior Fruit & Veg Bags

I never really imagined I would say “those pink bananas would be perfect for this!” but when I saw this project I immediately thought of pairing them with the pink mesh I had on hand. I matched the green leaves in the orange fabric to my green mesh and whipped up this duo.
Sewperior Fruit & Veg Bags

The tutorial has 2 sizes and I made one of each. The large would be perfect for celery or carrots, or a whole “bunch” of bananas (sorry, I can’t help myself when punny opportunities come along). The small is still plenty big for fruit, or smaller vegetables.
Sewperior Fruit & Veg Bags

Sewperior Fruit & Veg Bags

Sewperior Fruit & Veg Bags


Overall Impression

This digital magazine just keeps getting better and better and this latest edition didn’t disappoint. It’s so much more than just a great price on a bundle of patterns. The articles, stories and additional tutorials give it so much more value and I truly look forward to “flipping through the pages” and reading morsels here and there and taking in all the gorgeous photos. 

​You can grab your own copy here, or really treat yourself with a subscription here.

Now follow along the rest of the tour to see what everyone else has been making!

November 2017 Sales

Disclosure: Some links in this post are my affiliate links, which means I may earn a small commission on purchases made through these links at no additional cost to you. All opinions expressed here are my own. Thanks for your support.


Great bagmaking discounts to be found on this tour, plus prizes! Click the image below to get started on the tour.
Chris W Designs Global Blog Tour


Sew Sweetness Minikins

There’s a new bundle from Sew Sweetness and it’s going to blow you away! Save $40 on the bundle of 12 patterns and videos. Watch the video introducing all the patterns here
Sew Sweetness


Funky Monkey Fabrics